Setting Up a Virtual Data Room – Complete Guide
Setting up a virtual data room is a long process, so here are the easy steps to be followed in this article.
People might cooperate, share and securely keep documents and traverse complex deals in a safe and resourceful environment offered by online data rooms. Data room providers produced solutions for practically any scenario in any industry as the virtual data room’s offers grew. The most straightforward definition of a virtual data room is “digital internet storage”. They are, on the other hand, provide a variety of tools for improving the work process and expediting project completion in addition to being an online repository. Setting up a virtual data room is a long process, so here are the easy steps to be followed in this article.
Setting up a virtual data room
A virtual data room is an online information repository that is used for document storage and sharing. It is frequently used to help with due diligence during mergers and acquisitions, loan syndication, and private equity and venture capital deals. Setting up a virtual data room is a long process.
What’s a virtual data room?
A virtual data room (VDR) is a virtual area that functions similarly to a physical data room, except that all data is safely hosted online, with information security controls and usage reporting. Before the advent of virtual data rooms, M&A potential purchasers had to travel to a physical data room to peruse stacks of important documents and documentation. Multiple potential buyers can now access confidential information on the internet at the same time.
How do you use a virtual data room?
On the server, the VDR is installed. It serves as a centralized resource that anyone can access based on their credentials. As a result, the software runs on a server and provides access to its digital environment based on the credentials. Devices connect to the server in order to access the VDR and other apps.
Benefits of having a virtual data room in an organization
In today’s enterprises, a VDR is increasingly becoming a need. The ability to access essential files from a variety of technological devices denotes achievement in a variety of ways. Despite its ability to fit into a modest business budget, this may help startups by keeping their most important and sensitive data.
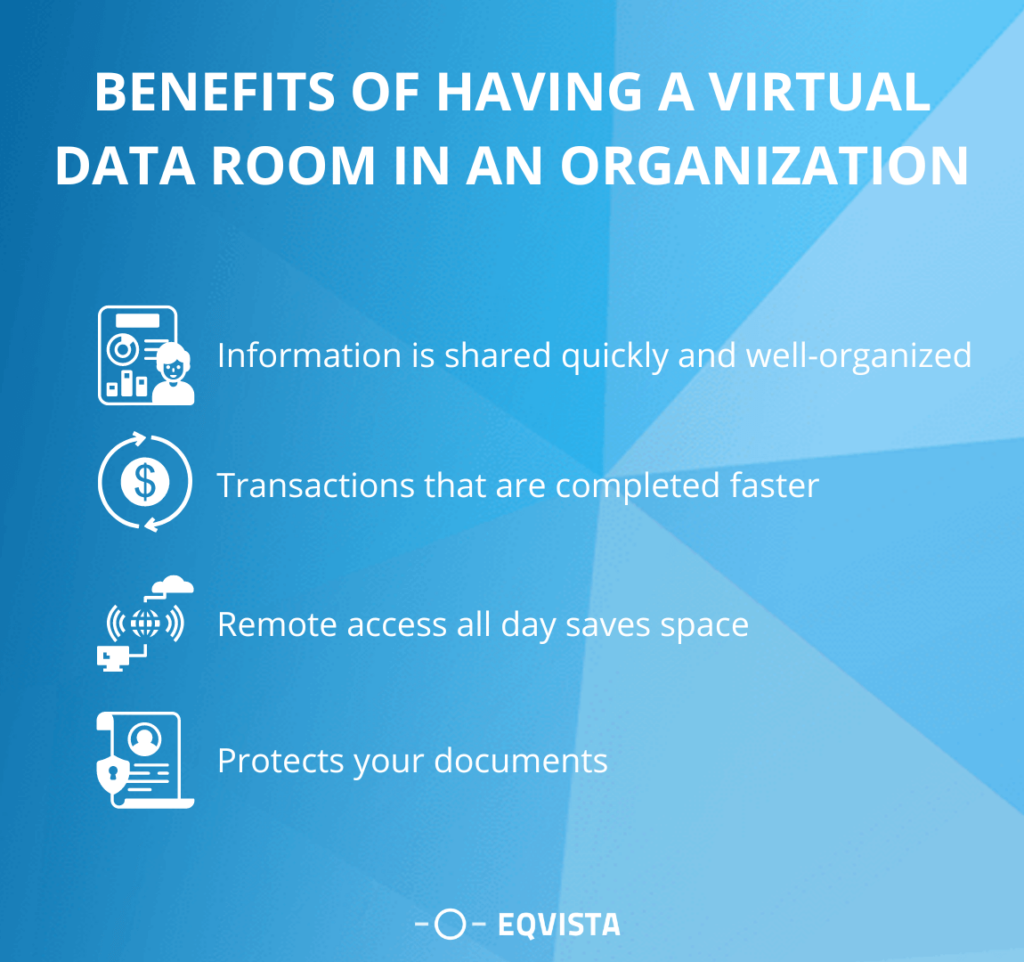
- Information that can be shared quickly and is well-organized – Your consumers and anyone who will be using the files will undoubtedly enjoy the ease with which they can simply browse through or view the file without any issues. Future clients will be more inclined to invest and submit a good bid on your projects because the data is more presentable. On your end, you’ll know exactly which files and data your investors and clients are looking at, which will help you expand your business.
- Transactions that are completed faster – Having your own Virtual Data Room makes it much easier to complete transactions faster and more smoothly. Unlike physical data rooms, you, your clients, and investors will not be required to visit the site at specific times. It enables you to gain access at any time and from any location. Your clients and investors will have access to the data and files at any time, resulting in a faster decision and, hopefully, a transaction.
- Remote access all day saves space – Another business recommendation from VDR-using startups is the ability to access data at any time. You’ll get the freedom of not having to access your data at specific times of the day. Physical data rooms are inconvenient in today’s fast-paced environment since they only allow access when they are open and only on-site.
- Protects your documents – When you use Virtual Data Rooms, you won’t have to worry about paper issues. All of your office papers, documents, training manuals, and contracts can be digitally converted and kept in a VDR. They will not fade with age and can be read on a laptop, desktop computer, or any other compatible smartphone or electronic device. You won’t need to buy large office cabinets to keep your data. To save your paper files, you won’t need to rent a storage facility. The number of manual records preserved is kept to a bare minimum. Furthermore, digital files are easier to arrange than paper-based files.
How to set up a virtual data room for your organization?
VDRs are secure online repositories that are perfect for sharing sensitive and secret information with third parties during large transactions like mergers and acquisitions. But how can you get started with this room? Here are the steps to be followed to set up the virtual data room.
1. Choose a virtual data room service provider
You must first choose a virtual data room provider before you can begin document storage or due diligence. Eqvista virtual data room software is an option. Once you’ve decided on a supplier, you can contact customer support for assistance and training as soon as possible. You’ll need to set up your virtual data room and invite users once you’ve chosen your provider.
2. Add users and create groups for them
It’s simple to create groups and add new users to a virtual data room. In this tutorial, we’ll go over how to use Eqvista data rooms to form groups, add new users, configure permissions, upload documents, and build folders. Administrators can set files and other permissions in Eqvista under the “Groups” page. Administrators can also see who belongs to which groups. Non-admin users can only see the members of the groups to which they have access. All you have to do to add new users is fill in their email addresses. The user will receive an email invitation and will be able to fill in all of their personal information. Simply click the “+” next to “Groups” and fill in the new group’s name.
3. Set Permissions
The “Groups” page contains all of the room’s permissions. File or folder permissions, admin permissions, membership permissions, group permissions, and more are all common permissions. It’s important to note that all file permissions are set at the group level. There are four file permission options to choose from: view, download, download original, and edit:
- Users can only access files that have a watermark.
- Watermarked files can be downloaded and printed by users.
- Original Files Can Be Viewed, Downloaded, and Printed – Users can view, download, and print original unwatermarked files.
- Users can update the index as well as move, upload, overwrite, delete, and rename files and folders.
- The file permissions tab appears as soon as you upload a file. View, download, download original, and modify are the options here.
- Permissions on files can be changed at any moment.
Administrators can set permissions for group members, parent folders, and more, in addition to file and request permissions. They can grant access to a specific group administrator, hide members from each other, and allow regular users to welcome new users, among other things.
4. Add documents and files
The content of the document tab allows teams to convert, retrieve, and classify documents and folders all in one place.
Take advantage of a variety of their capabilities, including:
- uploading in bulk
- document viewer built-in,
- look for a market,
- Plus, there’s drag-and-drop.
Thanks to the built-in Excel and document viewer, users can read files without ever leaving the platform. Users go to the “Documents” tab to add new documents and files. Users can then drag and drop documents into the VDR in bulk, and the system will maintain the file and folder structure when uploading. Despite the fact that all VDR systems have the same setup format, not all providers offer the same extra features, customer support options, or cost.
Important steps to set up a virtual data room
There are a few essential steps to be followed while setting up a virtual data room. These steps are extremely crucial and must be done one by one. Let’s understand these steps briefly below:
- Select a good VDR provider – There is a wide choice of data rooms with varying features and capabilities at every pricing point. This can make determining the ideal virtual data room for your specific requirements difficult. You can choose Eqvista as it offers various benefits and customized plans.
- Add users – After you’ve uploaded the papers to the data room, you’ll need to invite the users. Click User Management under Manage the data room (you will see the above screen). Then simply invite the folks who have the permissions you require. You must add the users to the Access Groups if you have the Pro version. You may add, amend, and remove access groups from the User Management page. If you have the Basic version, you don’t have to worry about access groups; simply invite the users who have the access rights you require.
- Naming the project – Project naming depends on the utility of the data room. One can name it according to the company goal and vision. It’s important to step in as it helps differentiate your data room from other files and folders.
- Select and add documents and reports – You can organize the data room by creating a file structure using the due diligence checklist. When sharing a large number of files with various stakeholders, it’s critical to guarantee that everyone can discover the files they need. Maintaining organization requires careful attention to file name conventions, categorization, ordering, and indexing. This index should be used in conjunction with your due diligence checklist.
- Organize files and folders – When uploading files, rename them so that the user understands what they are without having to look at them. Documents with names like “scan” and dates, for example, should be renamed to the correct file type. Furthermore, a standardized filing nomenclature and format should be adopted. Text-based documents should be saved as PDFs so that they may be viewed more easily. When possible, financial documents should be uploaded as Excel files. Users can change figures in the data room to see how changing variables affect financials.
- Give users access – After you’ve finished building your data room, you’ll be able to allow users access. Make sure you pay special attention to each user’s permission settings. If your platform includes auditability features, check in on a regular basis to see how active your users are and which files they are most interested in. If you notice that numerous users are accessing the same files at the same time, these files may be critical or have problems.
- Organize NDA – This room was created to eliminate the stress, headaches, and inconvenient aspects of sharing confidential documents for due diligence. As an M&A practitioner, the VDR is the one tool you’ll want to master. You can also put in place a non-disclosure agreement.
- Confirm and save documents – It’s time to upload your papers after you’ve figured out your data room’s security settings. You may need to vet and redact sensitive material on occasion. If this is the case, make sure you inform your investors in a timely manner.
- Download documents if needed – If you wish to download any of the documents from the storage. You can simply click on the required document and save it for further use.
Fastest and simple ways to add your document on Eqvista
This step-by-step guide will walk you through the process of sharing documents with your shareholders.
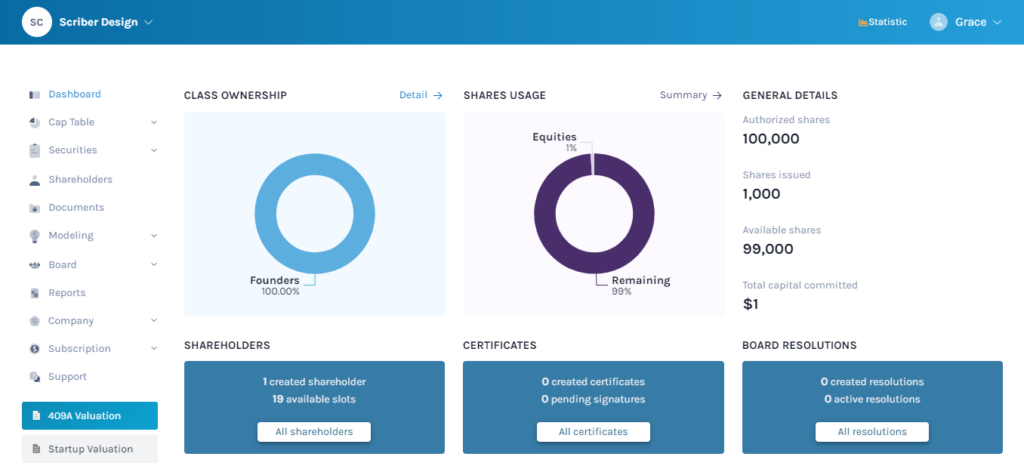
Step 1 – Go to the dashboard after logging into your Eqvista account and selecting the desired company profile. On the left-hand side panel of the dashboard, click “Documents”. After you’ve done that, you’ll be taken to the next page. You’ll be able to examine all of the documents associated with the company profile on this page. If you have not yet added any documents to your company’s profile and would like to, you may do so by selecting the “Add Documents” option.
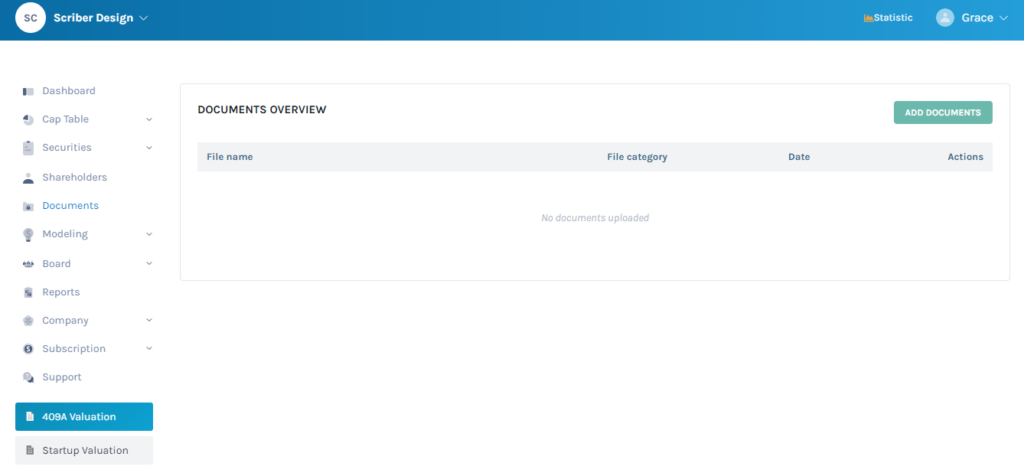
There is documentation in the corporation in this matter. But let’s imagine you wish to upload some documents. To do so, select “Add documents” from the drop-down menu as seen above.
Step 2 – When you select the “Add Documents” option, a new panel will open, as seen below.
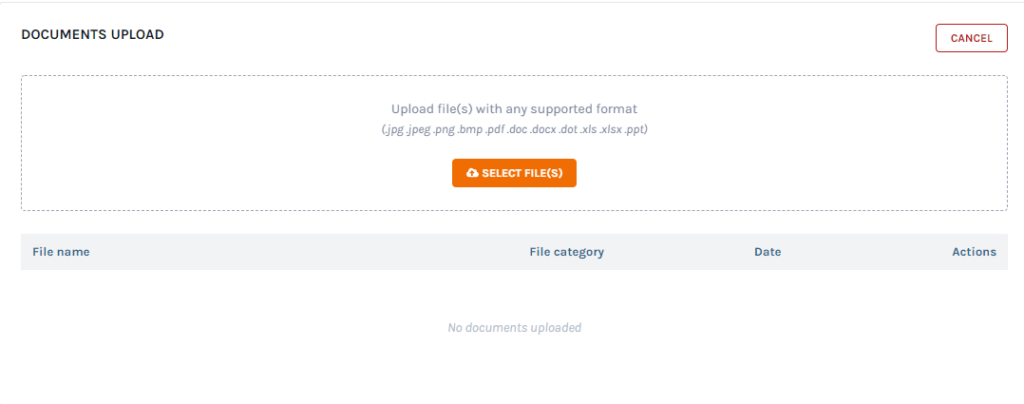
You’ll notice a button that reads “Select file(s)” here. Select the files to upload from your PC to the company profile online by clicking here.
Step 3: After clicking the field, a new dialogue box displays after clicking the field, as seen below. Click “Open” when you’ve finished selecting the file you wish to add to your company, click “Open”.
Step 4: The file will be added to the field on the panel where you picked the option to upload a file as soon as you click open.

However, before you add the file, make a selection from the drop-down list on the right-hand side, as seen above. We chose the option “tax returns” in this case because that is what the file is about.
After you’ve decided on an option and wish to proceed, click “Upload file”.
Step 5: When you choose this option, the file will be added to all of the other files. You’ll be able to share the document with the rest of your company’s team from here.

You can download the file by clicking the cloud icon on the right side under “Actions”. You can also change the file name and category by clicking the icon next to it.
Step 6: A new panel will emerge when you click “Access” as seen below.
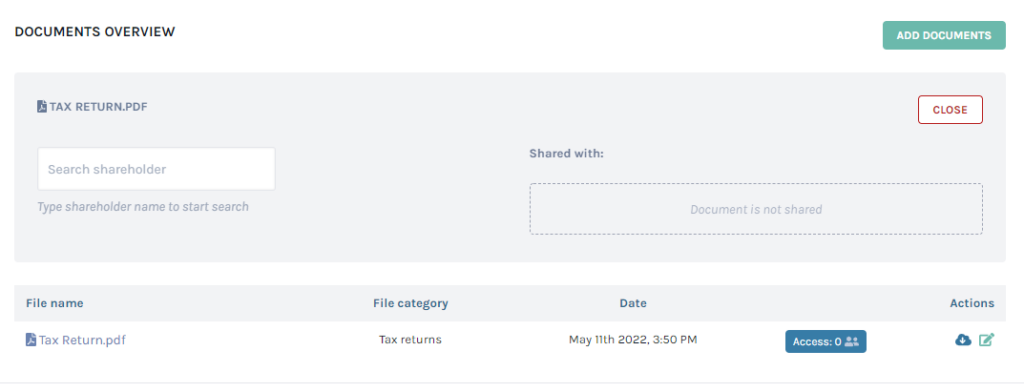
Just type in the name of the shareholder that you want to share the document with. Make sure that you have added the shareholder into your company’s Eqvista profile before doing this step. To learn about adding shareholders, read our support article here.

Step 7: After you’ve added everyone you want, click “Close” to save the progress.
After that, you’ll be able to see all of the documents and the number of people who have access to them. The material will then be shared with the appropriate shareholder. Follow the steps below to check what documents have been shared.
Step 8: Click “Shareholders” from the left-side panel on the dashboard to go to the page where you can see all of the shareholders’ names. Select the shareholder with whom you just shared the document by clicking on their name. It was “Alex Chan” in this case.
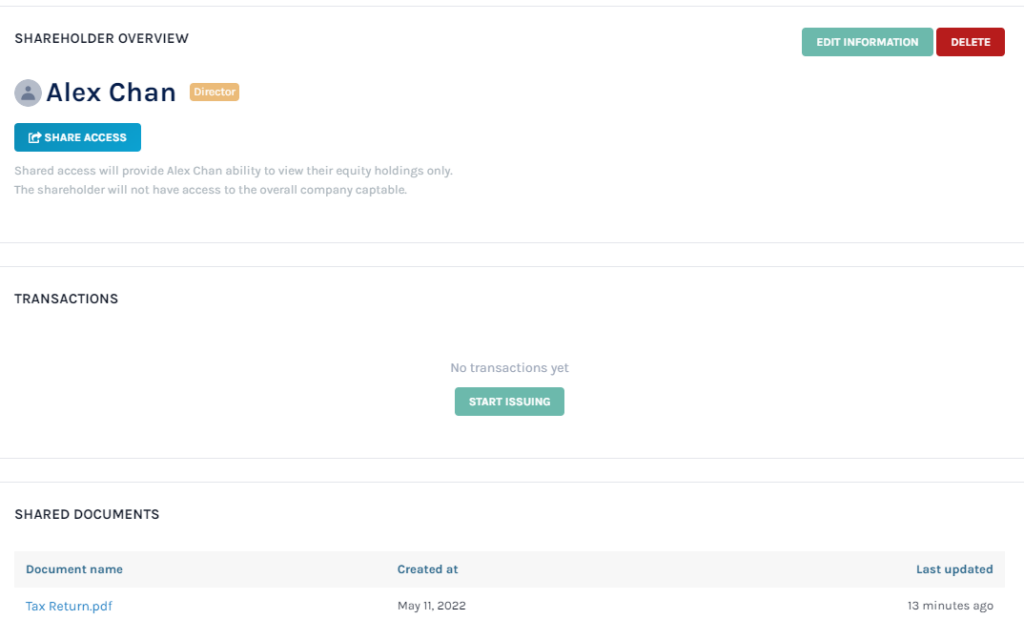
The name of the document you shared with the shareholder would be visible. It would display the message “No Shared Documents Yet” if no documents had been shared with the shareholder.
Why set up your virtual data room on Eqvista?
A virtual data room is the finest solution if you want to share information and documents within your firm. You can ensure that key documents in your firm are accessible without fear of them being misplaced or mistakenly deleted. It’s the most effective technique to keep all of your company’s records safe and secure. Eqvista’s virtual data room may become your most useful business intelligence platform, allowing you to share files with your team and clients while generating new leads without leaving your desk. Fill up the sign up form and get started today!
Interested in issuing & managing shares?
If you want to start issuing and managing shares, Try out our Eqvista App, it is free and all online!
