How to issue phantom stock on Eqvista?
Your organization might decide to issue phantom stocks to senior level employees as a part of employee benefit plan or incentive. With Eqvista, you can issue phantom stocks in minutes following some simple steps. The platform gives you all the flexibility to issue, manage, and repurchase phantom stocks as per the changing needs of your company.
What is a phantom stock?
A phantom stock is a type of agreement between a company and the receiver that promises a cash payment at a particular time in the future or on completion of a specific future event. The price of these stocks is directly tied to company performance, meaning just like other company stocks, the price of phantom stocks will also go up or down depending on the performance of the company.
These stocks are typically included in the benefit plan of senior management. They might also be used as a bonus for meeting certain targets. Phantom stocks are a great way to reward your employees with many of the benefits of company stock ownership without actually giving them company stocks.
Issue Phantom Stock on Eqvista
Here’s the step-by-step guide for issuing phantom stocks on Eqvista.
Step 1:

Log into the Eqvista application. On the left side menu on your dashboard window click on ‘Equities’ to reach the next page. You will find the ’Equities’ tab under the ‘Securities’ menu.
Step 2:

On the ‘Equities’ page, select the Equity Class for which you would like to issue the phantom stock. Here we have selected ‘Founders’. You may select any Equity class from the list as per your needs. Next, click on the ‘Issue Grants’ button on the right and the next new page will open.
Step 3:
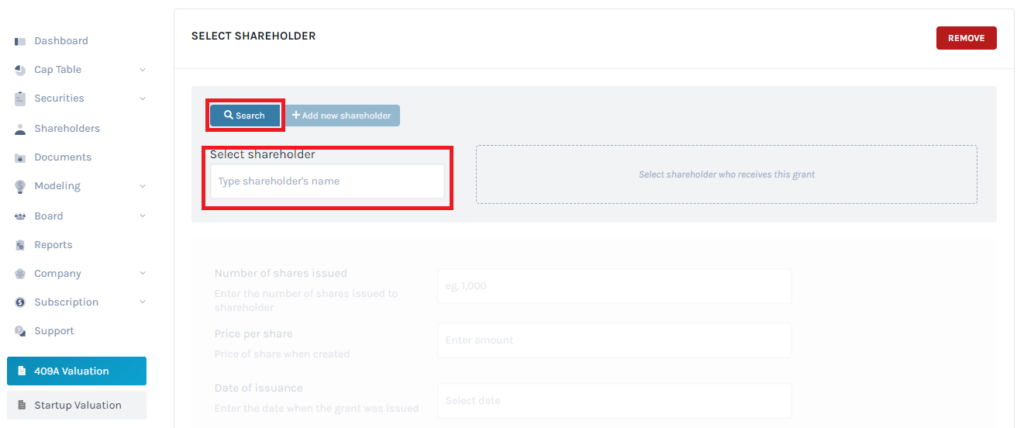
Here you have to find the name of the shareholder who will receive the phantom stocks. Type the name and select it from the box (to the right) to move to the next step.
If the individual is not already on your list of shareholders, you can add a new shareholder right from this page by clicking the ‘Add New Shareholder’ button.
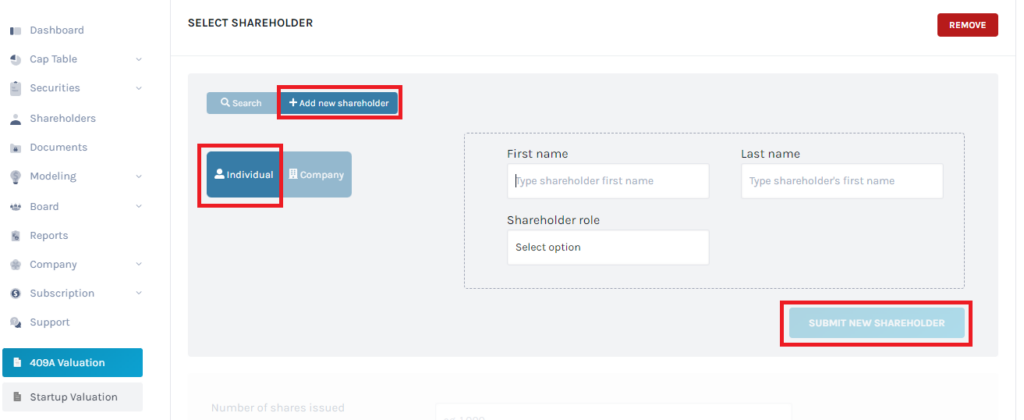
On clicking ‘Add New Shareholder’ you will have the option to choose between an ‘Individual’ and a ‘Company’. After making your selection, fill in the respective details on the form to the right. Finally, click on the ‘Submit New Shareholder’ button to add the new individual/company.
You can also refer to the support article Creating New Shareholders to know how to add a new shareholder.
Step 4:
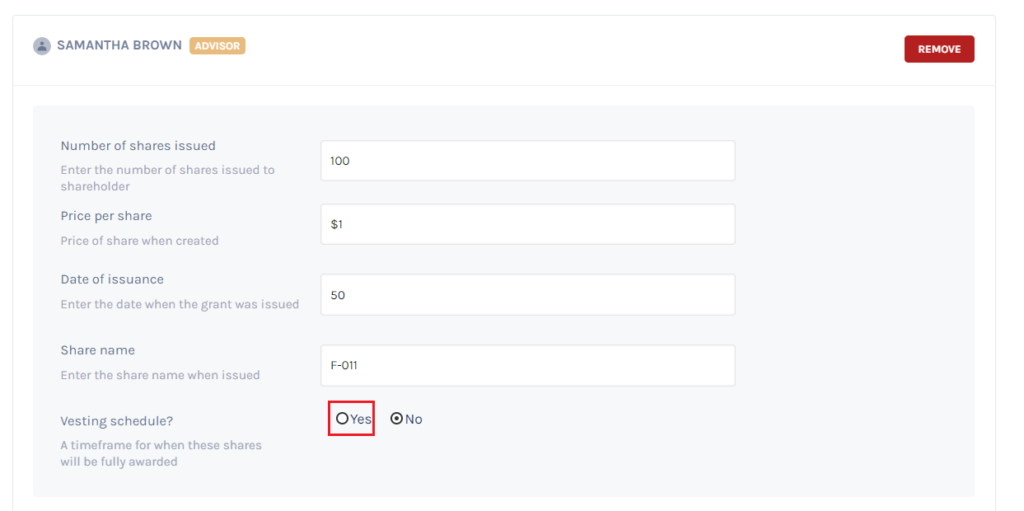
Once you have selected the name of the stock receiver, the above window will open. Fill in the fields with ‘Number of shares issued’, ‘Price per share’, ‘Date of issuance’, and ‘Share name’.
Under the ‘Vesting Schedule?’ click on ‘Yes’. This is set to ‘No’ by default. On clicking ‘Yes’, the next part of the form (as shown in the next image) will open.
Step 5:
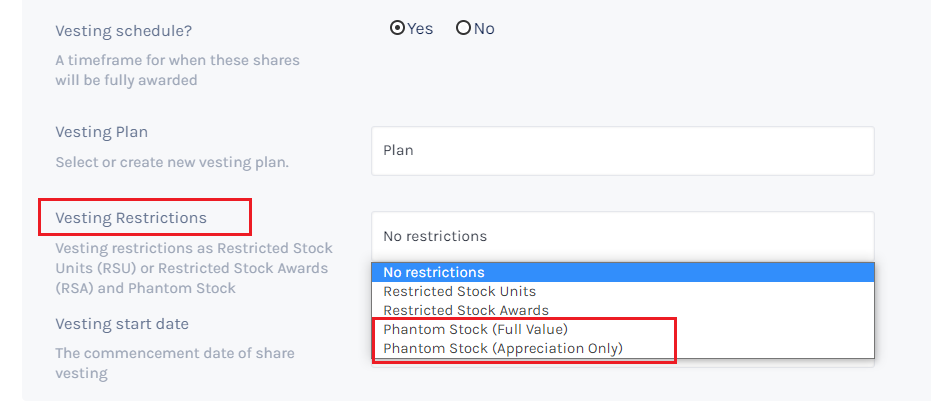
Here first you need to select the ‘Vesting Plan’. You can also create a new Vesting plan if you want. Refer to the support article Create a Vesting Plan for creating a new plan.
In ‘Vesting Restrictions’, click the white field beside it and you will find 4 options in the dropdown. You can select either ‘Phantom Stock (Full Value)’ or ‘Phantom Stock (Appreciation Only)’ from the options.
- If you select ‘Phantom Stock (Full Value)’, the shareholder will receive the full value of shares when sold.
- If you select ‘Phantom Stock (Appreciation Only)’ the shareholder will receive only the difference between the selling price and the original price of the shares when sold.
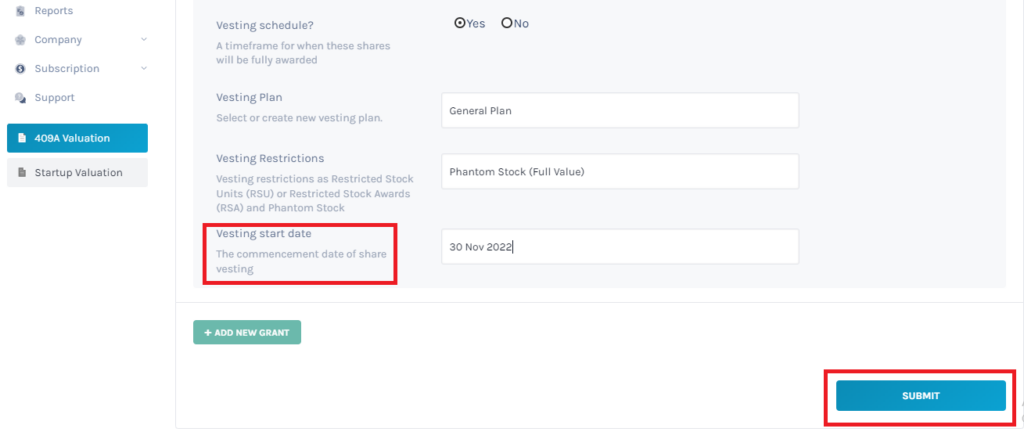
In the next field ‘Vesting start date’, choose the commencement date of share vesting and click on ‘Submit’.
Step 6:

After the issuance of the Phantom stock, you will be redirected to the Equity Grants page. Here you will see that the Phantom Stock against the name of the receiver is faded out and the ownership percentage will be displayed blank or not available (n/a).
Now that you have issued Phantom Stocks for your company, you can manage or repurchase them from the same platform. To know more about Phantom Stocks and how they work for your company you can read this article.
