How to create option grants (agreement) and e-sign them?
Option stocks are typically offered as a part of the employee compensation plan and are a great way to reward employees according to the value of the company. You can learn more about option grants and how your company can use them in this article.
Creating option grant agreements and e-signing
Creating and e-signing grant agreements is simple with Eqvista. Here’s your step-by-step guide to complete the process.
Note: The option agreements are only available for premium account holders. To unlock this feature, kindly upgrade your account.
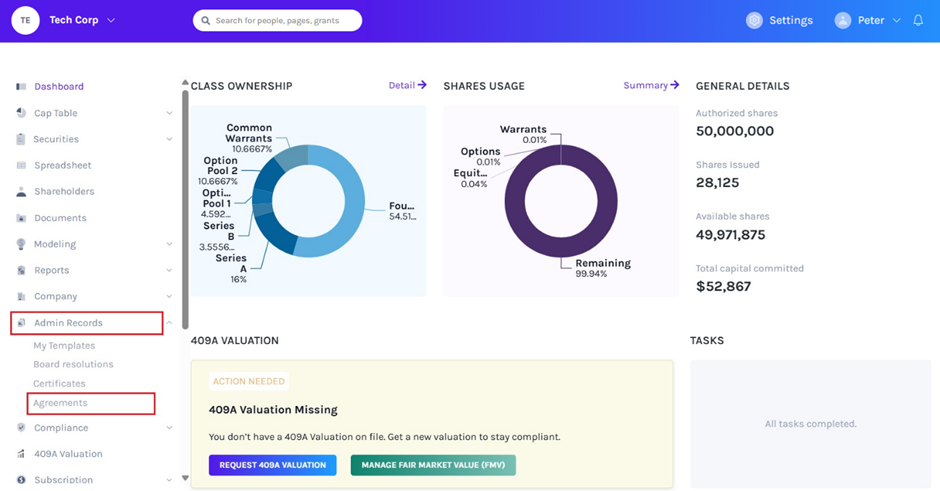
Step 1: Log in to your Eqvista account and select the company.
Under the ‘Admin Records’ menu you will see the ‘Agreements’ tab. Click on it to reach the above page.
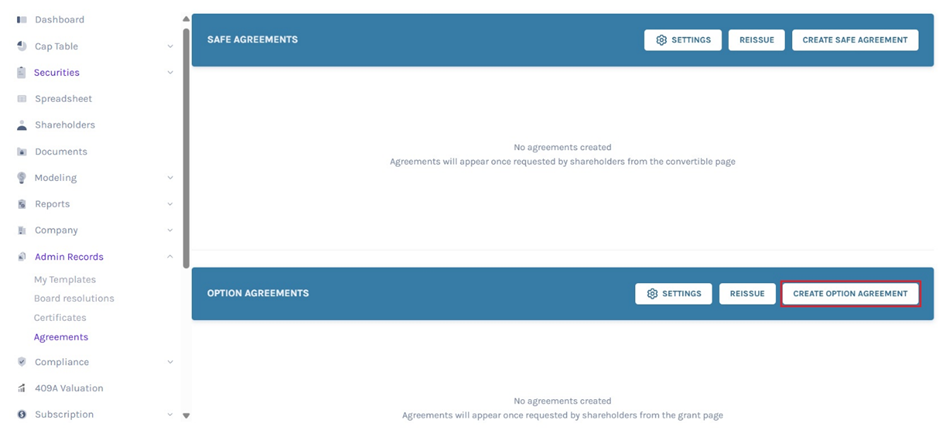
Step 2: On this page, the second blue bar will show the ‘Option Agreements’. Click on the ‘Create Option Agreement’ button to the right to reach the next page.
Note: You can enable automatic option agreement generation by clicking on “Settings”. Check out the support article to learn more about it!
Step 3: Just like creating SAFE Agreements, creating Option Grant Agreements also involves three steps, as mentioned on the right side grey box on the page shown above. Now we will see how to go about the first step – ‘Select grants’.
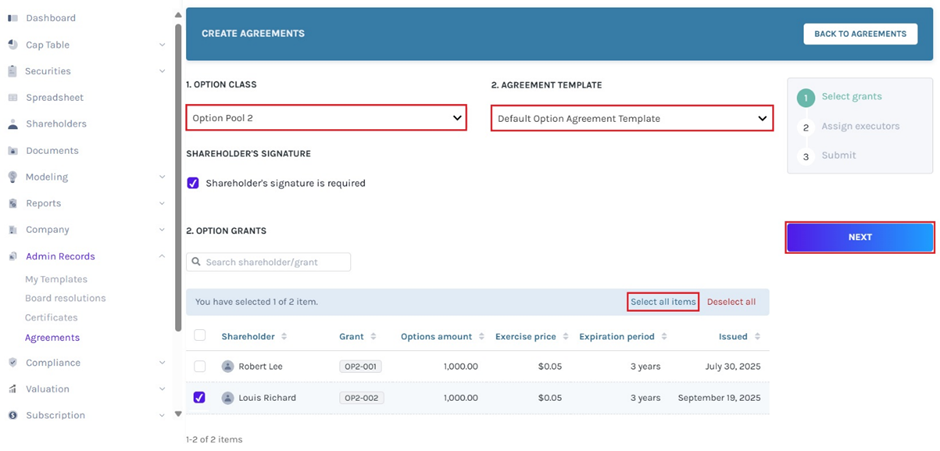
The option agreement template can be used when creating and selecting a template from the drop-down menu. Select the option class from the drop-down menu, and a list of all the employees for whom Option Grants have been issued appears. If you can’t see the name of some employees, scroll to the end of the page, and click next to go to the next page.
Note: To add more/new employees for Option Grants, follow this support article.
You can select the employees one by one by clicking on the box with their name or select all the employees available under ‘Option Grants’ by clicking on the ‘Select all items’ button.
On the top of the page, there is a ‘Shareholder’s signature required’ box, that you can check or uncheck as per your requirements. By default, it is set to require the shareholder’s signature. The ‘Cancel’ button on the top right will cancel everything you have done on this page so far and take you back to the previous step. Once you have selected the ‘Option Grants’, click on the ‘Next’ button.
Step 4: Now you need to assign the executor to the option grants you selected in the previous step. On the left side of the page, you will see the list of names of ‘Company Users’. Select the user who will execute the Option Grants, and the user will be added to the ‘Executor’ field.
You may change the designation of the executor from the dropdown just next to the designation displayed. Click on the tick symbol on the right of the box to add an executor. Remember, the agreement will need to be signed by all the executors you add here.
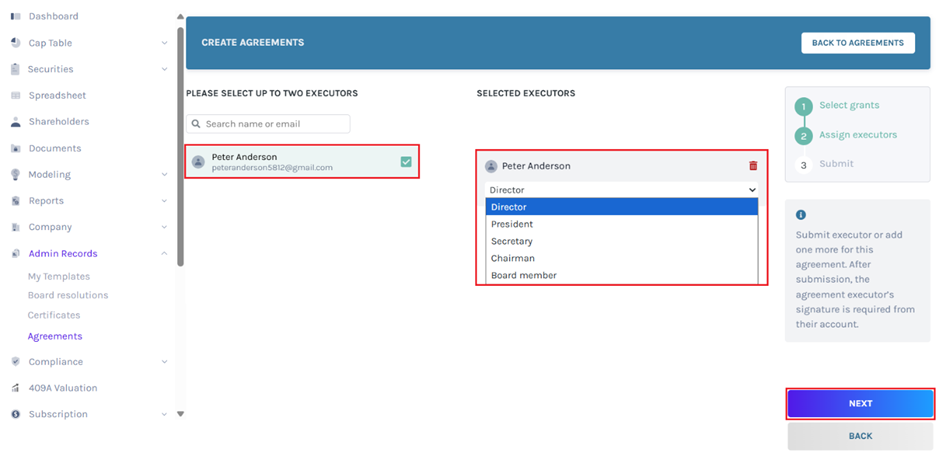
Note: The person who is selected to execute and sign the agreement should be either the director, the secretary, the President, the Chairman, or the Board Member. Company users can only be assigned as executors. To know how to add a company user read this support article.
Once you have added the executor(s), click on the ‘Next’ button to reach the next page.
Step 5: This page summarizes all selected information for creating the Option Grant Agreements. Review the information before you click on the ‘Submit’ button to create the agreements. If you want to change any information, click on the ‘Back’ button just below the ‘Submit’ button, and it will take you to the previous page where you can edit the information.
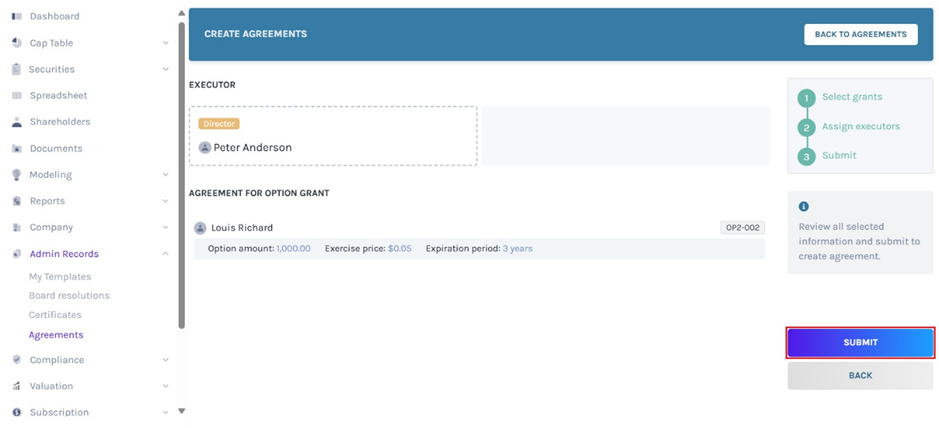
Remember, to make any changes to the Option Grant details for an employee as shown on this page, you will need to make the edits to the grant from the ‘Options’ tab under the ‘Securities’ menu. You may follow this support article to make the edits. The ‘Cancel’ button on the top right of this page will discard everything you have done so far and take you back to the ‘Agreements’ page.
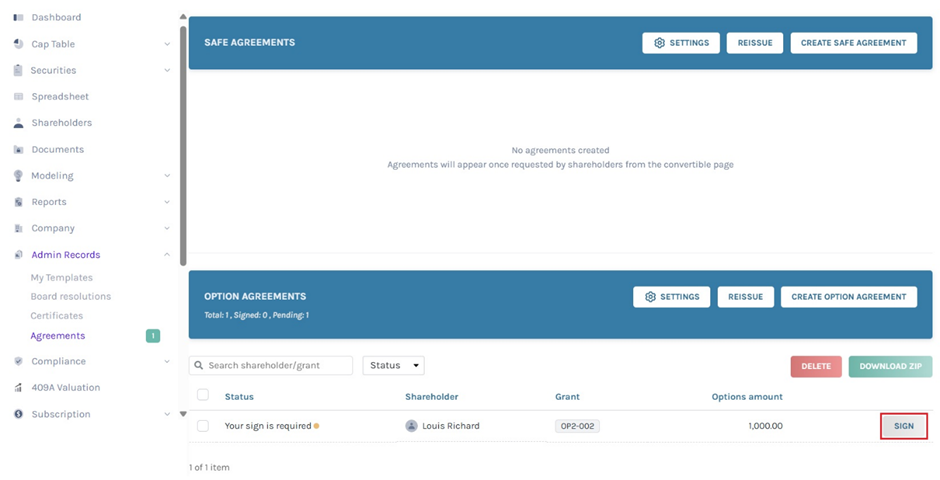
Step 6: On clicking the ‘Submit’ button in the previous step, the Agreement will be created, and you will be redirected to the ‘Agreements’ page as shown in Step 2. Only now, the ‘Option Grant Agreements’ you just created will be displayed instead of the blank field before.
To complete the process, each agreement should be e-signed. You will see ‘Your sign is required’/ ‘On sign’ under the ‘Status’ column against each employee’s name depending on the ‘Executor’ you have selected while creating the Agreements.
Note: You can reissue the SAFE agreement by clicking “Reissue” if the grant details have changed. Check out the support article to learn more about it!
Note: If you want to delete the agreement, select it and click on “Delete”. Apart from that, you will be able to perform many functions. To know more about it, check out the support article!
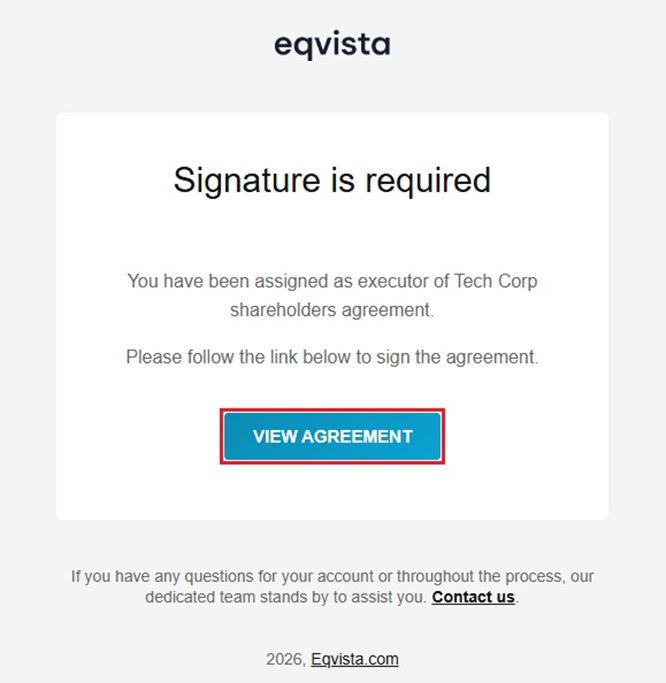
If you are the executor, ‘Your sign is required’ will be displayed and you will receive an auto-generated email in your inbox with the link to ‘View Agreement’ and sign it.
If you have selected ’Shareholder’s signature required’ in Step 3, the shareholder who will receive the Option Grant will also receive a similar email with the link to view the Agreement and sign it.
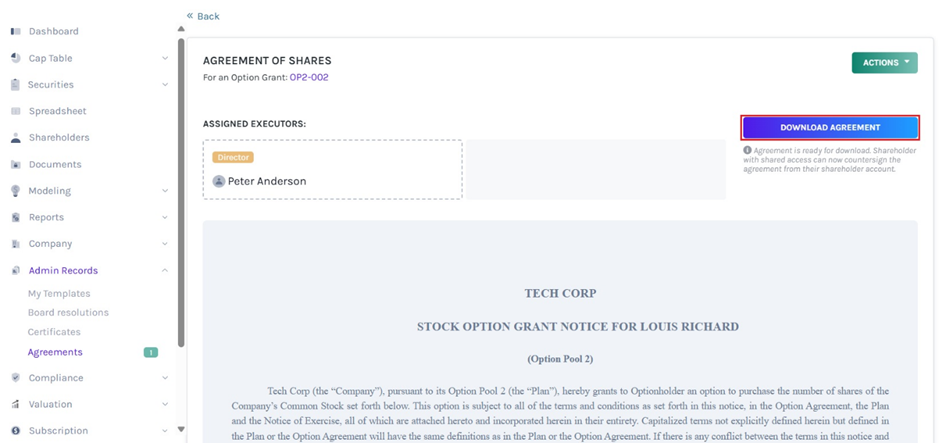
Step 7: By clicking the “Sign” button on the previous page or “View Agreement” on the mail you have received in your inbox, you will be directed to the ‘Option Grant Agreement’ that you need to sign. You can download the agreement without signing by clicking on “Download Agreement” as shown. Review the agreement before you proceed to sign it.
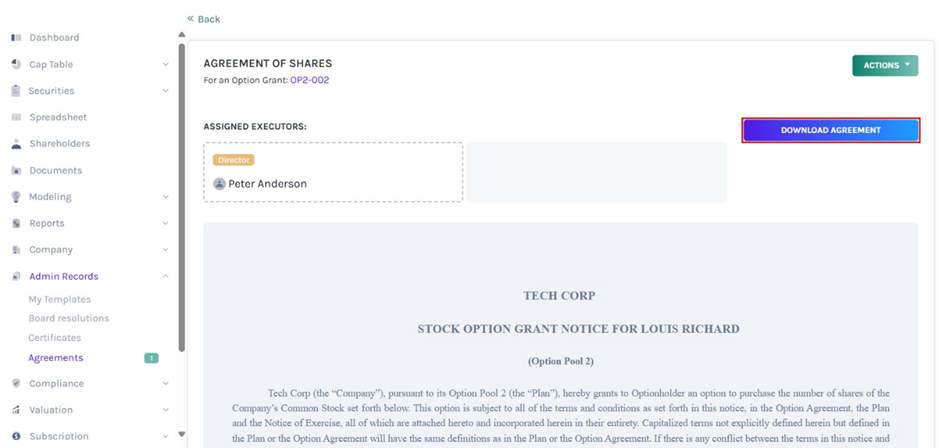
Note: If you want to delete the agreement, click on “Actions” on the top-right side of the page to get a drop-down menu and select “Delete”.
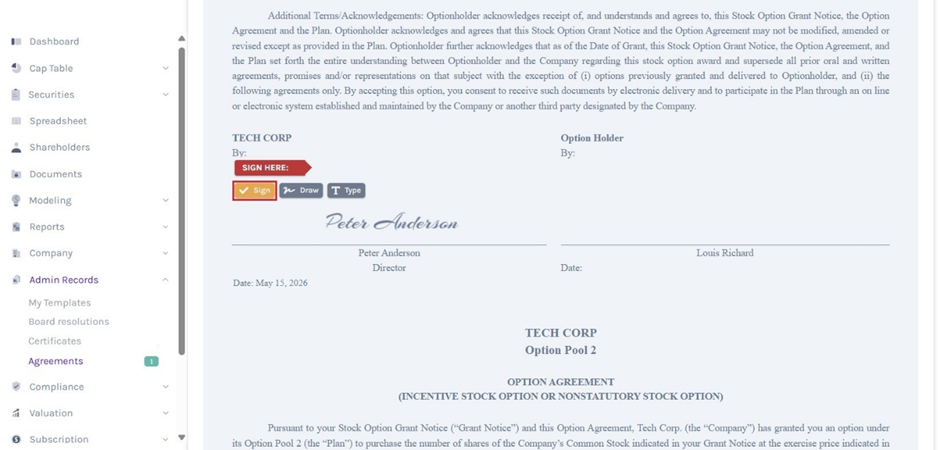
Step 8: To e-sign, scroll down the document and at the end of the ‘Stock Option Grant Notice’, you will find the space where you need to type or draw your signature to validate the agreement.
Note: If the executor and shareholder have saved their signatures in Eqvista they don’t need to draw or type – the saved signature will be placed in every agreement assigned to them, and they only need to click “Sign” to confirm signing.
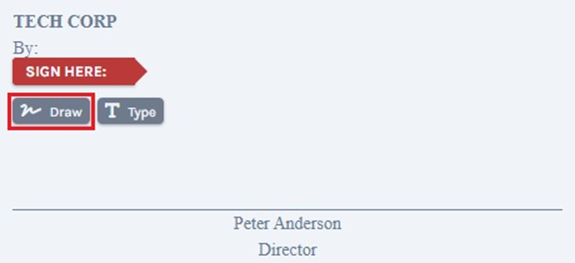
Method 1 – Signature
If you have chosen the “Draw Signature” option, using this plus sign and the mouse, draw your signature in the box.
To sign, click on the “Sign” above the box. If you want to re-do the signature, you can click on the “Clear” button beside the “Sign” button above the signing space, as shown below. Click the “Close” to change the option to type signature.
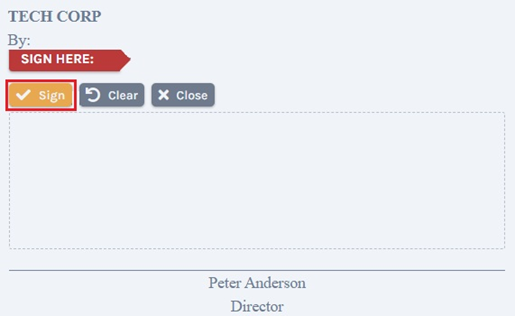
Once done, click on “Sign” above the box. A confirmation message appears, and click on “Yes” to sign. This is how the sign would look like when you use your cursor to sign the agreement.

Method 2 – Signature
Suppose you have chosen the option “Type signature”, then type your signature in the space provided as shown below.
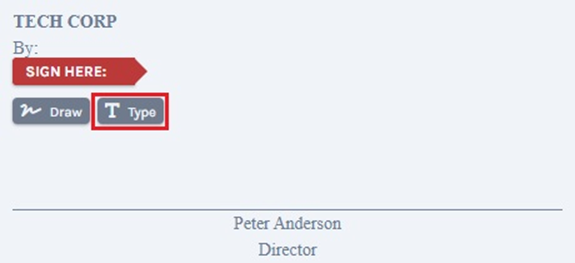
To sign, click on the “Sign” above the box. Click the “Close” to change the option to draw signature.
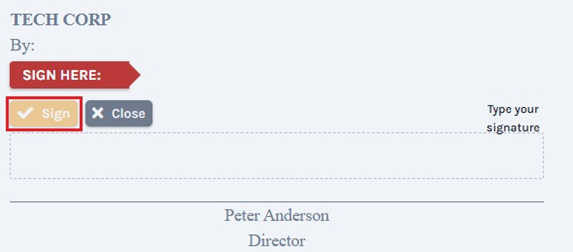
Once done, click on “Sign” above the box. A confirmation message appears, and click on “Yes” to sign. This is how the sign would look like when you type it to sign the agreement.
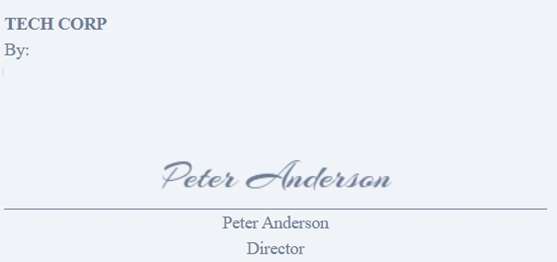
Once you are done, click on the “Sign” and the agreement will be signed.
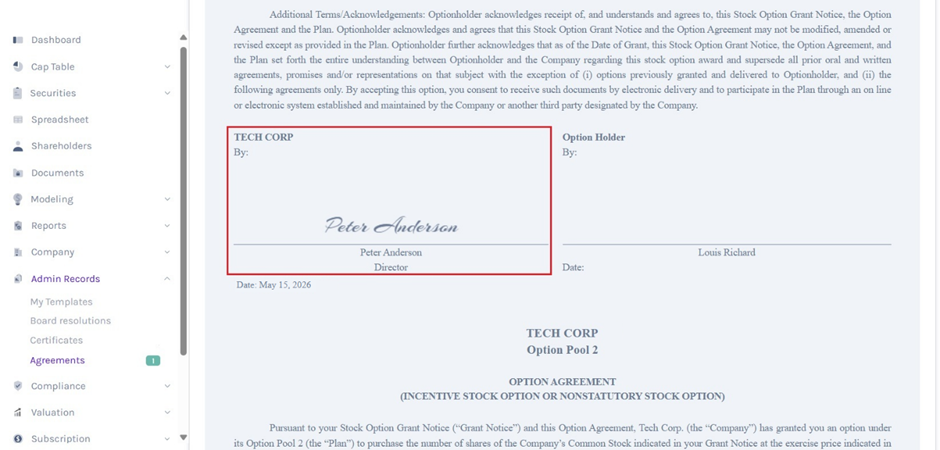
The signature field for the ‘Option Holder’ will remain blank until the holder signs the Agreement following the link sent to his/her email.
Note: Make sure you share access to the shareholder to view and sign the agreement. To know how to share access to the shareholder, check our support article.
Step 9: Once you have e-signed the agreement, you can download it from the ‘DOWNLOAD AGREEMENT’ button at the top right of the page. Select back button to go back to the ‘ Agreements’ page.
Note: The user can’t make any edits once the agreement is created. If you want to delete the agreement, click on “Actions” on the top-right side of the page to get a drop-down menu and select “Delete”. To delete the agreement after the shareholder has signed, you need to delete the note and re-issue it to create a new agreement.
Once the shareholder has signed the agreement, you can then download the completed agreement. The shareholder would also be able to download the agreement once they sign it.
You can read more about Option Grants here. Learn how to Setup and Modify Option Grants on Eqvista from this support article. Similarly, you can create Pre-Money SAFE agreements and Post-Money SAFE agreements.
